How to Put a Video in Google Slides (Steps)
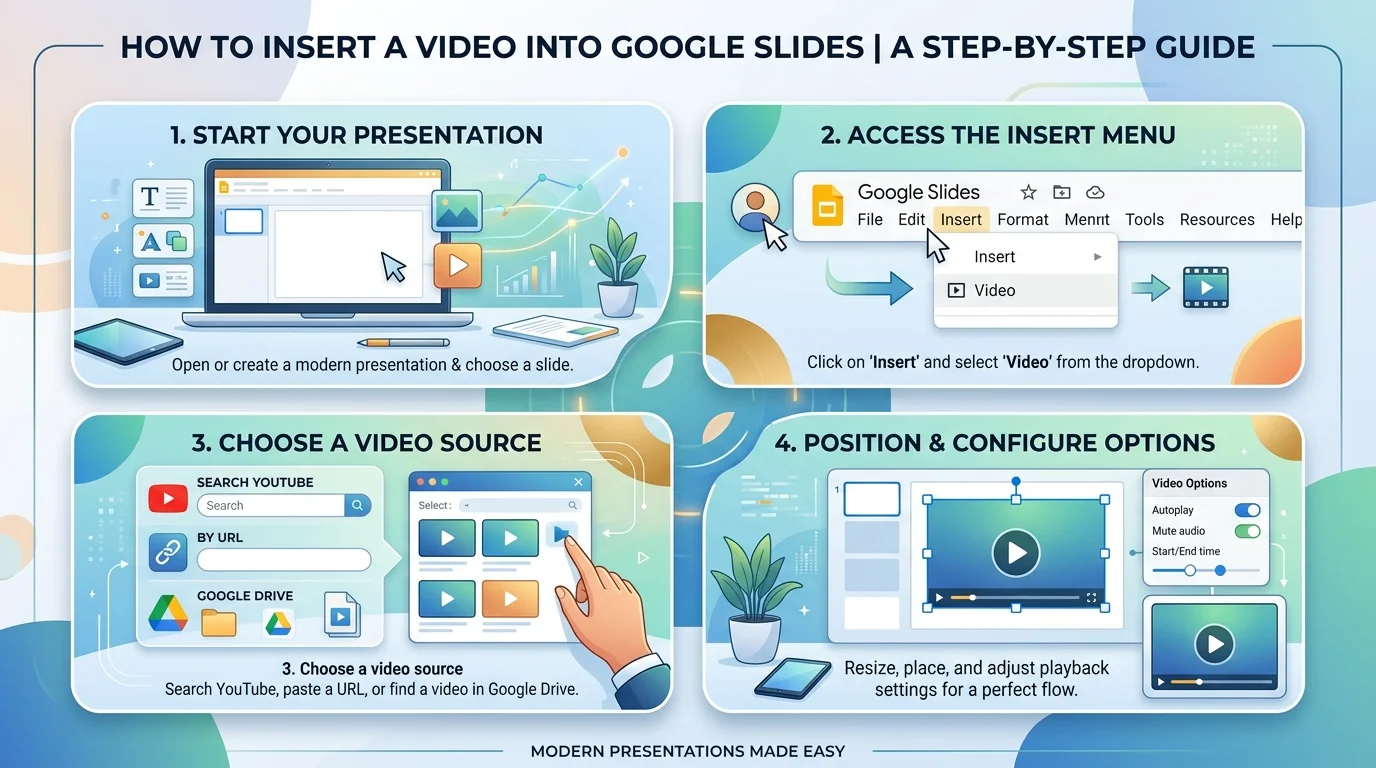
How to Put a Video in Google Slides. Putting a video in Google Slides takes under two minutes once the file is in the right place. You click Insert → Video, choose YouTube, Google Drive, or a direct URL, then select your clip — Slides handles the rest. The one rule that trips people up: your video has to live on YouTube or Drive first, since Slides won't accept a straight upload from your desktop.
That's the short version. Now let's get into the why and the how, because there's more nuance here than most guides admit.
You've built a killer presentation. The slides look sharp, the message is tight... and then it hits you. Something's missing. A little movement. A little life.
That's where video in Google Slides comes in.
I've put together this guide because, honestly, most tutorials on this topic either skip the annoying parts (the errors, the format issues) or bury the good stuff under fluff. Not here. By the end of this post, you'll know exactly how to insert video in Google Slides, fix it when it breaks, and make it look like you knew what you were doing all along.
Let's dive in.
Why Bother Adding Video to Your Slides at All?
Here's the thing — static slides are fine. But fine doesn't make people remember you.
Video does the heavy lifting your bullet points can't. And the numbers back this up: organic engagement rises by roughly 41% when a page includes video content, and brands with video content see customers interact with it around 10 times more than text-only content. That's not a small edge — that's the difference between a forgettable deck and one people actually talk about afterward.
A few reasons video pulls its weight:
It boosts audience engagement almost instantly
It's perfect for testimonials, demos, and tutorials
It saves you from talking for 45 straight minutes
It works alongside tools like Google Vids if you're creating original clips inside Workspace
So yeah. It's worth the five extra minutes of setup.
What You Need Before You Start
Quick gut-check before we get into the how-to.
You'll need a Google account, an active presentation open in Google Slides, and — this part trips people up — your video either on YouTube or already uploaded to Google Drive.
Yep. Google Slides won't let you drag a video straight from your desktop. It has to live on Drive or YouTube first. Annoying? A little. But once you know it, it's a non-issue.
Comparing Your Options at a Glance
Before you commit to a method, here's how the four approaches stack up side by side:
Method | Best For | Steps Required | Limitations |
|---|---|---|---|
YouTube embed | Published videos, tutorials | Insert → Video → Search/URL | Owner must allow embedding |
Google Drive embed | Original/private content | Upload to Drive → Insert → Video | Needs "Anyone with the link" sharing |
By URL | Fast linking of a known video | Insert → Video → By URL | Works best for YouTube links |
Hyperlinked screenshot | Vimeo, LMS, non-native platforms | Insert image → link it | Not a true in-slide embed |
Now let's walk through each one properly.
Method 1: Embed a YouTube Video (Easiest Option)
If your video already lives on YouTube, this is genuinely the fastest route. No uploading, no waiting, no drama.
Here's exactly how I do it:
Open your Google Slides presentation
Click the slide where the video should go
Click Insert in the top menu
Select Video
Choose the Search tab or paste the By URL link
Hit Select, then Insert
That's it. Your video now sits on your slide, ready to play.
Pro tip: if the video won't load, check whether the owner has embedding restrictions enabled on YouTube. That's usually the culprit.
Method 2: Insert a Video From Google Drive
Got an original video — a screen recording, client testimonial, or product demo? This method's for you.
First, upload the file to Google Drive (drag-and-drop works fine). Then:
Go to Insert → Video
Click the Google Drive tab
Find and select your file
Click Select
One thing I'll flag because it bites so many people: your video needs sharing permissions set to "Anyone with the link." Otherwise, it'll show a broken player for anyone who isn't you. Don't skip this step.
Also, stick to MP4 format whenever possible. Google Slides plays nicer with MP4 than with MOV or AVI, and converting beforehand saves you a headache later.
Method 3: Paste a Video by URL
Sometimes you just want to drop in a link fast, without hunting through Drive or YouTube's search bar.
Same Insert → Video menu, but this time click By URL, paste your link, and wait for the preview to load. If it shows up, you're golden.
Method 4: Hyperlink a Video (For Vimeo, LMS, or Other Platforms)
Now here's a workaround I genuinely like, because Slides doesn't natively embed everything.
Got a video hosted on Vimeo or an internal learning platform? You can't embed it directly — but you can link it.
Grab a screenshot of the video, insert it as an image, select it, hit Ctrl/Cmd + K, and paste your video URL. Clicking the image during a presentation opens the link. Not a true embed, but it works, and your audience won't know the difference.
How to Control Playback (Autoplay, Loop, and Trim)
Getting the video in is only half the job. Making it behave is the other half.
Click your video, then open Format Options → Video Playback. From here you control:
Play (on click) — the default, plays when you advance the slide
Play (automatically) — starts the moment the slide appears
Play (manual) — only plays when clicked directly
You can also set a start and end time, which is genuinely one of the most underused features here. Got a 10-minute video but only need 20 seconds? Trim it right in the panel — no external editor required. That said, if you'd rather clean up the raw clip before it ever touches Slides, our guide on how to trim a video in VLC is worth a look — it's a faster workflow when you're prepping several clips at once.
Want it to loop? That's handled separately through Slideshow → Autoplay, especially handy for kiosk displays or waiting-room screens. If you're distributing the deck online rather than presenting it live, the publish to web option gives you the same autoplay-and-loop control for a shareable link.
Don't Forget Audio
If your video needs narration playing alongside it, or you want background music across multiple slides, Slides also lets you add audio files (MP3 or WAV) the same way — Insert → Audio, then set it to loop or stop on slide change.
Fixing the Errors (Because They Will Happen)
Let's be real — video embeds break sometimes. Here's how to fix the big ones fast.
"Unable to Play Video: Error 150"
This almost always means the video has embedding restrictions, age limits, or regional blocks. If it's your own video, head into YouTube Studio and enable "Allow Embedding." If it's someone else's video and embedding is genuinely off the table, keeping a local copy on hand (as long as you have the rights to use it) can save your presentation — our YouTube video downloader guide covers how that works.
Error 5 (Google Drive Videos)
This one tends to show up specifically with Drive-hosted videos. Nine times out of ten, it's a permissions issue — recheck your sharing settings and make sure the file is set to "Anyone with the link."
No Sound on Playback
Open Format Options and make sure "Mute" isn't checked. Also — and I say this because I've been burned by it — check your actual system volume. Sometimes the fix really is that simple.
Adding Video on Mobile (Android and iPhone/iPad)
Mobile support is a little inconsistent depending on your device, so don't assume it'll behave exactly like desktop.
On Android, the Slides app generally handles video insertion from both YouTube and Drive. On iPad or iPhone, your safest bet is opening Slides through Safari, requesting the desktop site, and following the same Insert → Video steps.
If that doesn't work, take a screenshot, insert it as an image, and hyperlink your video — same trick from Method 4.
Google Slides vs. PowerPoint: Which Handles Video Better?
Quick tangent, because people ask me this a lot.
PowerPoint allows direct video upload from your computer — no Drive step required — which is a genuine convenience win. Google Slides, on the other hand, wins on real-time collaboration and cloud-based sharing, since everything streams instead of bloating your file size. If your team lives in Workspace, Slides is still the smoother choice overall — you're just trading one extra upload step for a lot of collaborative flexibility.
Level Up With the Right Tools
Here's my honest take: Google Slides handles the basics well, but its editing tools are, frankly, bare-bones. If you're serious about presentations — trimming clips cleanly, adding captions, recording polished screen demos — a dedicated tool changes the game entirely.
Tools like TechSmith Camtasia or VEED let you edit, caption, and export video before it ever touches your slide. I'd genuinely recommend testing one out if video is becoming a regular part of your workflow. It's the difference between a presentation that looks "fine" and one people actually remember.
Frequently Asked Questions
Is it free to add a video to Google Slides?
Yes, completely free. Google Slides, Drive, and YouTube embedding don't require any paid plan — you just need a Google account.
How long does it take to add a video to Google Slides?
Usually under two minutes if your video is already on YouTube or Drive. Add a few extra minutes if you need to upload the file to Drive first.
Can I upload a video directly from my computer?
Not directly. Google Slides requires the file to be on YouTube or in Google Drive first — there's no native "upload from computer" option in the Insert Video menu.
What video formats does Google Slides support?
MP4 is the safest bet. Some sources report MOV working as well, but converting to MP4 beforehand avoids most compatibility issues.
Why does my embedded YouTube video show Error 150?
This means the video's owner has embedding restrictions turned on, or the video has age/region limits. If it's your video, enable "Allow Embedding" in YouTube Studio.
Can I make a video play automatically without clicking?
Yes — select the video, open Format Options → Video Playback, and choose "Play (automatically)."
Final Thoughts
Adding video to Google Slides isn't complicated once you know where the landmines are. Upload to Drive or YouTube, use Insert → Video, set your playback options, and test everything in Present mode before it's showtime.
Do that, and your next presentation won't just look good.
It'll actually land.