Remove Background in GIMP: Free Step-by-Step Guide
You remove a background in GIMP by adding an alpha channel, selecting your subject with a tool like Fuzzy Select or Foreground Select, deleting or masking the background, and then exporting the file as a transparent PNG. GIMP gives you five core methods depending on how complex your image is, plus AI-powered plugins in GIMP 3.0 for a one-click option. That's the short version — now let's actually get you through it.
Let's be honest for a second.
You've probably tried to remove a background before and ended up with jagged edges, a weird white outline, or a background that "disappeared" and then came back as solid white the moment you exported it.
I've been there.
And here's the good news: GIMP can absolutely nail a clean, professional background removal — you just need to know which tool to grab and when.
In this guide, I'm going to walk you through exactly how I do it, step by step, no fluff, no filler. And if you end up using your finished cutout in a presentation, I've also covered how to put a video in Google Slides on the blog, which comes in handy for the same kind of visual prep.
Let's dive in.
What You Need Before You Even Start
Before you touch a single tool, there's one thing you absolutely need to get right — or none of the other steps will work, no matter how carefully you follow them.
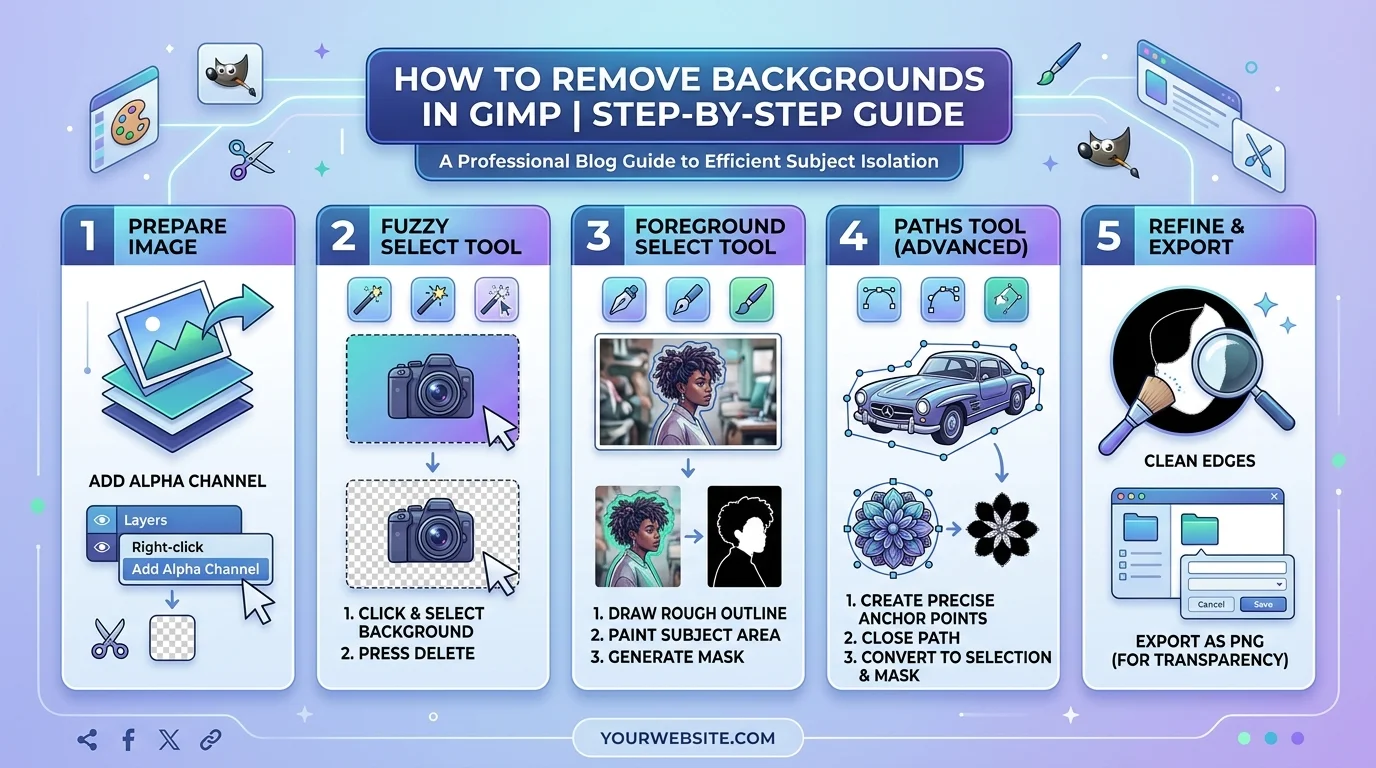
You need an alpha channel.
Without it, GIMP has no idea your image is even allowed to have transparent parts. So when you hit delete, instead of see-through pixels, you'll get solid white. Annoying, I know.
Here's the fix:
Right-click your layer in the Layers panel
Click Add Alpha Channel
If it's greyed out — great, you're already good to go
Also, duplicate your layer first. Trust me on this one. You'll thank yourself later when you mess up (and at some point, you will).
The 5 Ways to Remove a Background in GIMP
Okay, here's the fun part.
GIMP doesn't give you one magic button. Instead, it hands you a toolbox full of options, and each one shines in a different situation. So instead of picking randomly, match the tool to your image — that's really the whole trick.
Method 1: The Fuzzy Select Tool (aka the "Magic Wand")
This is where most people start, and honestly, it's a solid place to start.
The Fuzzy Select Tool grabs pixels that are similar in color and connected to each other. So if your background is one solid color — think product photos on white — this thing works like a charm.
Here's how:
Press U to grab the tool
Click once on the background
Adjust the Threshold slider if it grabbed too much (or too little)
Hit Delete once you're happy
Quick tip — if your background isn't perfectly uniform, this tool will frustrate you fast. Move on to the next one.
Method 2: Select By Color
Kind of the sibling of Fuzzy Select, but bolder.
Select by Color grabs every pixel of a similar shade across your entire image — not just the ones touching each other. So if your background color pops up in multiple spots (gaps between hair strands, for example), this one catches all of them in a single click.
Press Shift + O, click the background, and adjust the threshold the same way as Method 1.
Method 3: The Paths Tool (For Crisp, Clean Edges)
Now we're getting into "pro" territory.
The Paths tool is slower. I won't lie to you about that. But it gives you the cleanest, most precise edges of any method here — because you're literally drawing the outline yourself.
Here's the workflow:
Select the Paths Tool
Click around the edge of your subject, point by point
Drag the anchor handles to curve around rounded shapes
Once you're back where you started, convert the path to a selection
Invert the selection and delete the background
It takes patience. But if you need that magazine-cover level of precision, this is your tool.
Method 4: Foreground Select (Your Best Friend for Hair and Fur)
This one's a lifesaver, and I mean that.
The Foreground Select Tool is built specifically for subjects with tricky, wispy edges — hair, fur, fuzzy sweaters, you name it.
Here's what you do:
Draw a rough line through your subject
Click Select
GIMP analyzes the edges and creates a refined selection automatically
Clean up any leftovers with the brush
Genuinely, this is the single highest-leverage tool in your kit once hair or fine detail is involved — nothing else here comes close.
Method 5: Layer Masks (The Non-Destructive Way)
If you only remember one method from this whole article, make it this one.
Layer masks don't delete anything. Instead, they hide parts of your image using black and white. Paint black, and that area disappears. Paint white, and it comes right back.
Why does this matter? Because you can undo mistakes instantly — just paint white over the spot you removed by accident. No frantic undo-clicking required.
Professionals lean on this method constantly, and once you try it, you'll get why.
Quick Comparison: Which Method Should You Actually Use?
Here's the cheat sheet so you're not guessing every time:
Method | Best For | Difficulty | Non-Destructive? |
|---|---|---|---|
Fuzzy Select | Solid, single-color backgrounds | Easy | ❌ No |
Select by Color | Scattered background color | Easy | ❌ No |
Paths Tool | Precise, clean geometric edges | Hard | ✅ Yes (until flattened) |
Foreground Select | Hair, fur, soft edges | Medium | ✅ Yes |
Layer Masks | Any image, especially revisions | Medium | ✅ Yes |
AI Plugin (rembg) | Speed, batch processing | Easy | ✅ Yes (as mask) |
If you're new to GIMP, start with Fuzzy Select on a simple photo, then work your way down this table as your images get more complex.
The GIMP 3.0 Shortcut: AI-Powered Background Removal
If all of that sounds like more manual work than you have time for, GIMP 3.0 has you covered.
Newer AI background remover plugins for GIMP 3.0 run models like u2net, isnet-general-use, and even sam directly inside GIMP's Python-Fu menu. You pick your model, hit run, and the plugin hands you a clean cutout — optionally applied as a layer mask so you can still fine-tune it afterward.
There's also a batch-processing plugin if you're working through dozens of product photos and don't want to repeat these steps one image at a time.
It's not perfect on every image, especially tricky reflective or semi-transparent subjects, but as a first pass? It'll save you a genuinely huge amount of time.
How to Export So the Transparency Actually Sticks
Here's a mistake I see constantly, and it's a heartbreaker every time.
You do all that careful work... and then export as a JPEG. And guess what? JPEG doesn't support transparency at all. Your see-through background just turns solid white again, like none of it happened.
So instead:
Go to File > Export As
Choose .png (or .webp for a smaller file size)
Click Export
That's it. Your transparent PNG is ready to use anywhere — websites, thumbnails, product listings, you name it. And once you've got a folder full of these exports piling up, it's worth a look at how to declutter digital files so your old versions and duplicate PNGs don't turn into a mess later.
Common Mistakes That Wreck Your Cutout
A few things to watch for, because I've made every single one of these myself at some point:
Skipping the alpha channel — nothing will turn transparent without it
Ignoring halo artifacts — those faint outlines around hair or edges usually mean weak contrast between your subject and background
Working destructively — always prefer masks over flat-out deleting pixels
Zooming out too much — small edge mistakes are invisible at 100% zoom but painfully obvious once you post the image online
Zoom in to at least 200%. It's a small habit, but it makes a genuinely massive difference in the final result.
When Manual Editing Just Isn't Worth Your Time
Look, I love GIMP. It's free, it's powerful, and once you know these five methods, you can handle almost any image that comes your way.
But sometimes? You just don't have the time.
If you're processing dozens of product photos, or you need a clean cutout in seconds rather than minutes, tools like remove.bg or Photoroom use AI to detect your subject and strip the background instantly — hair, fur, and all.
You upload the photo. The AI background remover does the rest. You download a clean, transparent PNG in seconds, no selection tools required.
For quick one-off edits or if you're just starting out, GIMP's manual tools are genuinely all you need. But if background removal is part of your daily workflow, it's worth pairing GIMP with one of these AI tools — your future self, staring down a folder of fifty product photos, will thank you for it.
FAQ
Why does my background turn white instead of transparent in GIMP?
This almost always means you skipped the alpha channel step, or you exported as JPEG instead of PNG. JPEG can't store transparency, so any see-through area gets filled with white the moment you export.
Is GIMP as good as Photoshop for background removal?
GIMP covers the same core techniques — selection tools, layer masks, AI plugins — completely free. Photoshop's Select Subject and Refine Edge are slightly faster out of the box, but GIMP gets you comparable results with a bit more manual work.
Is GIMP free to use?
Yes, GIMP is completely free and open-source, available on Windows, Mac, and Linux, with no subscription or paywalled features.
Which file format should I export to keep transparency?
PNG is the safest universal choice. WebP works too and produces smaller files, but double-check your platform supports it before relying on it.
How do I remove a background around hair without a halo?
Use the Foreground Select Tool or a hand-painted layer mask instead of Fuzzy Select, and make sure there's decent contrast between your subject and background before you start.
Final Thoughts
Removing a background in GIMP comes down to one simple sequence: add an alpha channel, pick the selection method that matches your image, mask or delete the background, then export as PNG.
You now have all five manual methods, the newer AI plugin route, and the export steps to make sure the transparency actually holds up. Pick the tool that fits your image, follow the steps above, and you'll have a clean cutout ready to use — no subscriptions, no guesswork.
Go give it a shot.